Trek Overview
Har Ki Dun Trek A Spiritual And Scenic Journey Through The Valley Of God
Har Ki Dun Trek lies within the Govind Wildlife Sanctuary and National Park. Situated in the Himalayas, this trek offers enchanting beauty, a bracing climate, and lush green meadows. What could be better than spending a few days in this serene paradise? Har Ki Dun Trek is often referred to as the “Valley of Gods.” It sits at an altitude of 11,958 ft (3,645 m) and follows a historic route that is over 500 years old.
Har Ki Dun Trek Complete Guide
Our mission has always been to ensure that no trekker steps into the Himalayas without the right perspective. A trek is not just a checklist of summits; it is a serious commitment to the outdoors. Having the right information is what separates a reckless climb from a soulful journey.
This section serves as your definitive manual for the Har Ki Dun Trek. We have distilled years of mountain experience and real-time feedback into this guide to give you a clear, honest picture of the trail.
We provide this depth of information because we want you to be more than just a visitor—we want you to be a prepared, responsible trekker who respects the mountains as much as we do
Trek Itinerary
1: Short Itinerary
Overview: Trek Summary at a Glance
Har Ki Dun Trek Day by Day Short Itinerary, Altitude, and Trek Distance
Day 1: Drive from Dehradun Railway Station to Sankri Base Camp
Altitude Gain: 2,089 ft to 6,309 ft | Drive Distance: 190 km | Drive Duration: 8 to 9 hours | Overnight Stay: Mountain Hostel , Sankari. | Pick-up point for Trek Himalyan Soul trekkers: Dehradun Railway Station at 7:00 am
Route: Dehradun → Mussoorie Kamptifall → Naugaon → Purola → Jarmola → Sankri
Highlight: Reach the Har Ki Dun Trek Pickup Location, Dehradun Railway Station, at 7:00 am. The Trek Himalyan Soul team will receive you there and brief you about the trek. Then the journey begins with a scenic drive from Dehradun through the Garhwal hills to reach Sankri village, which serves as our base camp for the Har Ki Dun Trek.
Day 2: Drive from Sankri to Dharkot/Gangad via Taluka and same day trek to Cheludgad Near Seema
Altitude Gain: 6,309 ft to 8,158 ft | Drive Distance: 25 km | rive Duration: 1 to 2 hours | Trek Distance: 05 km | Trek Duration: 4 to 5 hours | Trek Difficulty: Easy to Moderate | Overnight Stay: Cheludgad Campsite (Twin Sharing)
Highlight: Travel from Sankri to Dharkot by taxi, then trek 5 km to Cheludgad camp through scenic forests and villages. Camp overnight under the stars and start early for the next day.
Day 3: Trek from Cheludgad Camp to Bhosla Camp Via Kalkatiyadhar
Altitude Gain: 8,158 ft to 9,795 ft | Trek Distance: 12 km | Trek Time: 2/3 hours | Trek Difficulty: Moderate | Overnight Stay: Bhosla Campsite (Twin Sharing)
Highlight: The trek from Cheludgad to Har Ki Dun camp takes 5–7 hours, follows a moderate trail through forests and meadows, and offers stunning views of Swargarohini,waterfalls, and the Himalayan peak.
Day 4: Exploration Day Trek from Har Ki Dun Valley or Manida Tal- Jamadar Glacier
Altitude Gain and Loss: 9,795 ft to 12,720 ft to 9,795 ft | Trek Distance: 08 km | Trek Time: 6/7 hours | Trek Difficulty: Moderate | Overnight Stay: Har Ki Dun Campsite (Twin Sharing)
Highlight: Exploration Day in Har Ki Dun valley involves a moderate trek to Manida Lake and Jaundhar Glacier Viewpoint. Expect alpine meadows, rocky paths, and stunning views of glaciers and Himalayan peaks.
Day 5: Trek from Har Ki Dun to Cheludgad Camp Via Osla Village
Altitude Loss: 9,795 ft to 8,158 ft | Trek Distance: 13 km | Trek Time: 6/7 hours | Trek Difficulty: Easy to Moderate | Overnight Stay: Cheludgad Campsite (Twin Sharing)
Highlight: Trek from Har Ki Dun to Cheludgad via Osla offers lush forests, riverside trails, and traditional village charm. It’s a moderate descent with scenic views, cultural encounters, and peaceful wilderness camping.
Day 6: Trek from Cheludgad to Dharkot/Gangad
Altitude Loss: 8,158 ft to 6,309 ft | Trek Distance: 05 km | Trek Time: 5/6 hours | Trek Difficulty: Easy | Drive Distance: 25 km | Drive Duration: 1 to 2 hours | Overnight Stay: The Grand Shiva Hotel (Twin Sharing)
Highlight: Trek 5 km from Cheludgad to Dharkot in 3–4 hours, then drive 25 km to Sankri. Start early, carry essentials, and enjoy forested trails and scenic views along the descent.
Day 7: Drive Back from Sankri Market to Dehradun City
Altitude Loss: 6,309 ft to 2,089 ft | Drive Distance: 190 km | Drive Duration: 8 to 9 hours | Drop point for Trek Himalyan Soul trekkers: Dehradun Railway Station
Route: Sankri → Jarmola → Purola → Naugaon → Mussoorie Kamptifall → Dehradun
The drive from Sankri to Dehradun takes 8 to 10 hours through scenic valleys, forests, and mountain villages. Start early, pre-book transport, and enjoy Himalayan views, rivers, and rest stops en route
2: Detailed Day-wise Itinerary
A Complete Route & Campsite Breakdown
Detailed Day-Wise Itineary - Day 1
Day 1: Drive from Dehradun Railway Station to Sankri Base Camp
Total distance:190 km, 8 to 9 Hours journey | Mode of journey: By Tempo Traveler 13+D/ taxi, (Non-AC Vehicle) | Altitude: Sankri base camp 6,309 ft (1922 m) | Night stay: the grand shiva Sankri on a twin share basis
Trek Himalyan Soul organizes transport for trekkers from Dehradun Railway Station in the morning, which will leave for Sankri around 6:00 am to 7:00 am.
Dehradun Mussoorie Road: The route to Sankri often begins by heading towards Mussoorie Road. Along this route, you’ll start witnessing the gradual ascent into the hills. The drive itself offers beautiful views of the surrounding valleys and forests.
Kempty Falls: If you have time for a detour, Kempty Falls is a popular tourist spot along Mussoorie Road. It’s a scenic waterfall surrounded by lush greenery, offering a refreshing stop on your journey.
Yamuna Bridge: As you continue your drive, you’ll cross the Yamuna Bridge. This bridge offers stunning views of the Yamuna River flowing through the valley below.
Naugaon: Naugaon is a small town you’ll pass through on your way to Sankri. While there might not be significant markets here, you can find local shops and eateries to grab a quick snack or take a break.
Purola: Purola is another town along the route where you can find local markets. It’s a good place to stock up on any essentials you may need for your journey ahead.
Jarmola: As you near Sankri, you’ll pass through Jarmola, a small village known for its serene surroundings and traditional Himalayan architecture. Take a moment to enjoy the quaint charm of this village before continuing your journey.
Sankri: Finally, you’ll arrive at Sankri, a scenic village nestled in the Uttarkashi district of Uttarakhand. The drive from Dehradun Railway Station to Sankri takes about 8 to 10 hours, depending on road conditions and traffic.
Throughout your journey, you’ll encounter numerous viewpoints offering breathtaking vistas of the Himalayas and the surrounding valleys. Be sure to stop and take in the beauty of the landscape as you make your way to Sankri.
Day -2
Day 2: Drive from Sankri to Dharkot/Gangad via Taluka and same day trek to Cheludgad Near Seema
Total distance: 27 km, 5 to 6 Hours journey | Mode of journey: 25 km by taxi and 5 km on foot | Altitude: Sankri (6,309 ft) to Cheludgad (8,158 ft) | Night stay: Cheludgad Campsite (twin share basis stay )
Sankri to Dharkot/Gangad via Taluka Dhatmeer village by Taxi
Start early in the morning from Sankri to make the most of your day, and hire a taxi to Dharkot via Taluka. It’s a scenic 25 km drive that takes you through dense forests and runs alongside the picturesque Supin River. The journey typically takes around 45 minutes to an hour, depending on road conditions, so it’s advisable to arrange your taxi in advance or secure one upon arrival in Sankri to ensure a smooth start to your trek
Trek from Dharkot to Cheludgad Camp
Upon reaching Taluka, that is the actual starting point for the Har Ki Dun Trek and begin your trek toward Cheludgad camp. This section of the trek covers around 6 km and typically takes 4 to 6 hours to complete, which may vary upon your pace and the trail conditions.
Day 2 Trek Highlights
(I) – The route offers a rich visual experience, winding through dense forests, alongside glistening rivers, and beneath towering mountain vistas.
(II) – Along the way, you’ll pass through charming villages, verdant landscapes, and cross wooden bridges that span bubbling streams.
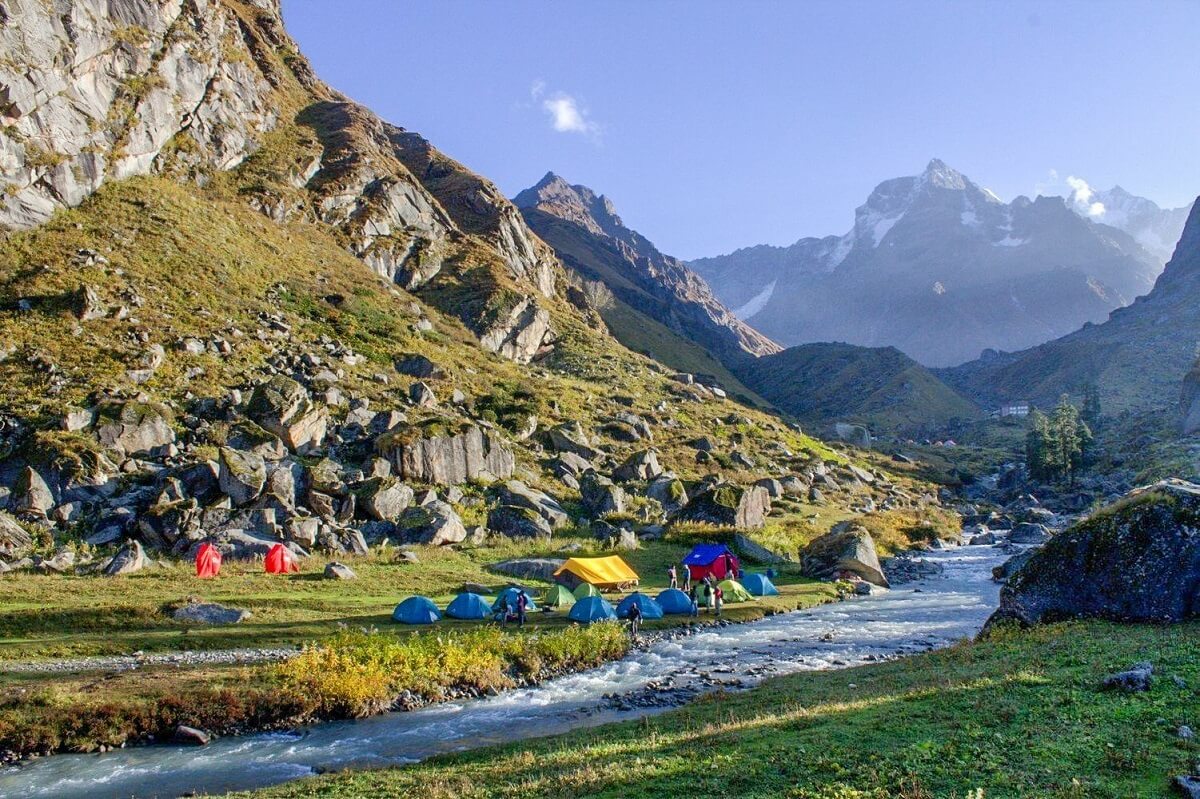
(III) – Cheludgad camp, nestled in tranquil surroundings, provides a picturesque and peaceful setting to pitch your tent and rest for the night.
Overnight at Cheludgad Camp: Once you have reached the Cheludgad campsite, you can set up your tents and settle in for your first camping night on the Har Ki Dun Trek. It’s the perfect place to soak in the stillness and marvel at a night sky glittering with stars.
You can choose to cook your own meals if you’re equipped with your own camping gear, or coordinate in advance with local guides or camping services to have warm, healthy food prepared for you, adding comfort to your mountain experience.
Pro Tip:
(I) – It’s essential to start early to ensure you have enough daylight for both the taxi ride and the trek to Cheludgad camp.
(II) – Check the weather conditions before starting your trek and prepare accordingly with appropriate clothing, footwear, and gear.
(III) – Carry sufficient water, snacks, and any other essentials for the trek.
(IV) – Ensure you have the necessary permits if required for trekking in the region.
(V) – Respect the local environment and culture, and follow Leave No Trace principles while trekkingDay -3
Day 3: Trek from Cheludgad Camp to Bhosla Camp near Har Ki Dun
Total distance: 12 Km, 6/7 Hours journey | Mode of journey: On foot | Altitude: 8,158 ft (Cheludgad) to 9,795 ft (Har Ki Dun Campsite) | Night stay: Har Ki Dun Campsite (twin share basis)
Day 3 Trek Route
The trek from Cheludgad camp to Har Ki Dun follows a clear trail, gradually ascending through forests, meadows, and stream crossings. As you move deeper into Govind National Park, you’ll encounter diverse flora and fauna along the way. After a few hours of trekking through this scenic landscape, you’ll arrive at the stunning Har Ki Dun valley to pitch your tents surrounded by the majestic views of Swargarohini, Hata Peak.
Day 3 Trek Difficulty Level
Day 3 of Har Ki Dun is considered to be of moderate difficulty. While the trail is well-marked and not overly steep, some sections involve gradual ascents and descents. You can use trekking poles and sturdy trekking shoes to navigate with ease, especially while crossing streams.
The journey from Cheludgad camp to Har Ki Dun camp generally takes between 5 to 7 hours, depending on your pace and the condition of the trail. Weather plays a significant role, and your level of fitness will also impact how quickly you complete the journey.
Day 3 Trek Highlights
(I) – Throughout the trek, you’ll be treated to breathtaking views of the surrounding Himalayan peaks, including Swargarohini, Bandarpoonch, and Black Peak.
(II) – The trail offers panoramic vistas of lush green valleys, snow-capped mountains, and cascading waterfalls.
(III) – As you approach Har Ki Dun camp, the scenery becomes even more spectacular, with the iconic valley opening up before you, surrounded by towering mountains.
Overall, the trek from Cheludgad camp to Har Ki Dun camp is a memorable experience, combining natural beauty with a sense of adventure. Be sure to carry essential trekking gear, stay hydrated, and take breaks as needed to enjoy the stunning views along the way.
Day -4
Day 4: Exploration Day Trek from Har Ki Dun Valley or Manida Tal- Jamadar Glacier
Total distance: Manida Lake 8 Km, 5 to 6 Hours journey | Jaundhar Glacier: 14 km, 7 to 8 Hours journey | Mode of journey: On foot | Altitude Gain and Loss: 9,795 ft (Har Ki Dun) to 12,720 ft (Manida Lake) to 9,795 ft (Har Ki Dun) | Night stay: Har Ki Dun Campsite (twin share basis)
Exploration Day in the Har Ki Dun valley, with visits to Manida Lake and the Jaundhar Glacier View, offers an opportunity to witness some of the most breathtaking sights in the Himalayas. Here’s a detailed guide:
Begin your day early from the Har Ki Dun campsite and trek to the picturesque Manida Lake, surrounded by alpine meadows and forested landscapes. After a short break, continue to the Jaundhar Glacier Viewpoint, which involves a slightly more challenging ascent. The trail features moderate difficulty with varied terrain, including rocky paths and gentle climbs. Return to the campsite by late afternoon, with sturdy shoes and trekking poles highly recommended.
Day 4 Trek Difficulty Level
The trek to both Manida Lake and the Jaundhar Glacier Viewpoint is moderately challenging. Though the trails are generally well-defined, certain sections can be steep or rocky, demanding a reasonable level of physical fitness and prior trekking experience for a safe and comfortable journey.
Jaundhar Glacier (around 13,123 ft): If you want to go to the Jaundhar glacier, 7 km away from the Har Ki Dun valley. Then you have to cross some ridges, the trail is not an easy one and remains covered in snow, but ahead it eases.
After reaching the final ridge, you will see the Jaundhar Glacier and other towering peaks, then we’ll return to the Har Ki Dun campsiteand enjoy delicious evening snacks, Soup, and Dinner, enjoying a bonfire and an overnight stay there.
Day 4 Trek Highlights
(I) – Throughout the trek, you’ll be surrounded by the majestic peaks of the Himalayas.
(II) – The Har Ki Dun valley is known for its panoramic views of peaks such as Swargarohini, Bandarpoonch, and Black Peak.
(III) – From the Jaundhar Glacier Viewpoint, you’ll get a closer look at the glaciers and snow-capped peaks that define the region.
(IV) – Manida Lake offers serene surroundings with crystal-clear waters reflecting the surrounding mountains.
(V) – The Jaundhar Glacier Viewpoint provides a stunning panorama of glaciers cascading down from high mountain peaks.
(VI) – Along the trekking route, you’ll be treated to spectacular vistas of alpine meadows, lush forests, and cascading waterfalls.
(VII) – Keep an eye out for wildlife such as Himalayan birds, ibex, and musk deer, which are commonly spotted in the region.
Overall, the Exploration Day trek to Manida Lake and the Jaundhar Glacier Viewpoint offers a perfect blend of natural beauty, adventure, and Himalayan grandeur. Be sure to carry adequate water, snacks, and camera gear to capture the unforgettable moments along the way
Day -5
Day 5: Trek from Har Ki Dun to Cheludgad Camp Via OSLA Village
Total distance: 12 km, 6 to 7 Hours journey | Mode of journey: On foot | Altitude Loss: 9,795 ft (Har Ki Dun) to 8,158 ft (Cheludgad) | Night stay: Cheludgad campsite (twin share basis)
Day 5 of the trek starts with a descent from the Har Ki Dun campsite in the morning, heading toward the village of Osla, nestled along the banks of the Supin River. From Osla, follow the trail leading back to Cheludgad camp. The route offers a scenic journey through dense forests, quaint Himalayan villages, and vibrant meadows, making for a peaceful and visually rewarding return trek.
Day 5 Trek Difficulty
The trek from Har Ki Dun to Cheludgad camp via Osla Village is of moderate difficulty. While the trail involves some steep descents and ascents, it is generally well-defined and suitable for trekkers with moderate fitness levels.
Day 5 Trek Highlights
(I) – As you descend from Har Ki Dun towards Osla, you’ll be treated to panoramic views of the Har Ki Dun valley and the surrounding peaks.
(II) – The trail passes through lush green forests and offers glimpses of the Supin River flowing alongside.
(III) – Upon reaching Osla Village, you’ll have the opportunity to explore its traditional architecture and interact with the locals.
(IV) – Continuing towards Cheludgad camp, the trail offers stunning vistas of the Himalayan foothills and valleys below.
(V) – Osla Village is known for its ancient temple dedicated to Duryodhana, a character from the Hindu epic Mahabharata.
(VI) – Along the trekking route, you’ll be treated to spectacular vistas of alpine meadows, lush forests, and cascading waterfalls.
(VII) – Cheludgad camp provides a tranquil setting amidst the Himalayan wilderness, making it an ideal spot to unwind and enjoy the natural beauty of the surroundings.
Overall, the Exploration Day trek to Manida Lake and the Jaundhar Glacier Viewpoint offers a perfect blend of natural beauty, adventure, and Himalayan grandeur. Be sure to carry adequate water, snacks, and camera gear to capture the unforgettable moments along the way
Day -6
Day 6: Trek from Cheludgad to Dharkot/Gangad -Same day Drive to Sankri via Taluka
Total distance: 27 km, 5 to 6 Hours | Mode of journey: 05 km on foot and 25 km by taxi | Altitude Loss: 8,158 ft (Cheludgad) to 6,309 ft (Sankri base camp) | Night stay: The Grand Shiva Home Stay Sankri (twin share basis)
Trek from Cheludgad to Dharkot via Taluka
Start your trek early in the morning from the Cheludgad campsite for a smooth descent to Taluka. The trail spans approximately 25 kilometers and usually takes 4 to 6 hours, depending on your pace and trail conditions. As you descend through lush forests, open meadows, and gentle streams, be sure to carry enough water and snacks. Take breaks to rest and soak in the views, aiming to reach Taluka by late morning or early afternoon.
Trek Difficulty day 6 of the Har Ki Dun Trek
The descent from Cheludgad via Osla on Day 6 is relatively easy and less strenuous compared to earlier sections of the trek. The well-marked trail involves a gradual downhill walk through forests, meadows, and villages, making it comfortable for most trekkers. However, steady footing is still important on uneven terrain, especially if the path is wet or muddy.
Drive from Taluka to Sankri
(I) – Upon reaching Taluka, arrange for a taxi or private vehicle to drive you back to Sankri.
(II) – The drive from Taluka to Sankri takes approximately 45 minutes to an hour, covering a distance of around 11 kilometers.
(III) – Enjoy the scenic drive back to Sankri, passing through picturesque villages and landscapes.
(IV) – Upon reaching Sankri, you can relax and unwind after the trek.
(V) – It’s essential to start the trek early to ensure you have enough time to reach Taluka and catch transportation back to Sankri.
(VI) – Along the trekking route, you’ll be treated to spectacular vistas of alpine meadows, lush forests, and cascading waterfalls.
(VII) – Cheludgad camp provides a tranquil setting amidst the Himalayan wilderness, making it an ideal spot to unwind and enjoy the natural beauty of the surroundings.
Day -7
Day 7: Drive Back from Sankri Market to Dehradun City
Total distance: 190 Km, 8 to 9 Hours journey | Mode of journey: By Travel=lers 13 seater
Day 7 trek Highlights
(I) – After breakfast, the Trek Himalyan Soul team will celebrate your successful accomplishment of your Har Ki Dun trek and award you with a completion certificate. It’s a humble yet meaningful symbol of your endurance, determination, and the bond you’ve formed with the mountains.
(II) – After that, we will begin our return journey to Dehradun. The drive offers breathtaking views of the Himalayan peaks and valleys throughout the journey.
(III) – As you descend from the mountains towards the plains, you’ll pass through lush green forests, meandering rivers, and terraced fields.
(IV) – The drive from Sankri to Dehradun usually takes around 8-10 hours, depending on road conditions, traffic, and the chosen mode of transportation.
Har Ki Dun Trek Route From Sankri To Dehradun
(I) – The route from Sankri to Dehradun typically follows the same path as the one taken when you initially traveled from Dehradun to Sankri.
(II) – You’ll start by leaving Sankri and heading towards Taluka, continuing through the scenic valleys and forests.
(III) – After crossing the bridge, you’ll continue along the road towards Naugaon and then further towards Purola.
(IV) – From Purola, the route takes you through Jarmola and Mori, eventually leading to Naugaon, Kempty Fall, Mussoorie, and then to the Dehradun drop-off location.
Transport Options
(I) – You can hire a tempo traveler or taxi from Sankri for the journey back to Dehradun.
(II) – Tempo travelers are larger vehicles suitable for groups, while taxis are better for smaller groups or individuals.
(III) – Ensure you arrange for transportation in advance, especially during peak tourist seasons, to avoid any last-minute hassles.
(IV) – If you are doing the Har Ki Dun trek with Trek Himalyan Soul, then you do not have to worry about transportation from Sankri to Dehradun, as the trek coordinator arranges for you
3: Har ki dun trek difficulty and experties
The Har ki Dun trek is generally considered to be a moderate trek, suitable for beginners and experienced trekkers alike. It offers a beautiful and relatively accessible trail through the western Garhwal Himalayas in Uttarakhand, India.
The trek usually takes around 06 nights and 07 days to complete, covering a distance of approximately 47 kilometers round trip. The trail involves moderate ascents and descents, with some steep sections, rocky paths, and occasional river crossings. However, compared to other high-altitude treks in the region, the Har ki Dun trek has a relatively gradual ascent, making it more manageable for beginners.
The highest point on the trek is the Jaundhar Glacier, which is situated at an altitude of around 4,200 meters (13,780 feet). Altitude sickness is generally not a major concern on this trek unless you have a pre-existing condition or are particularly sensitive to altitude.
While physical fitness and stamina are important for any trek, including Har ki Dun, it is advisable to prepare yourself with regular exercise and some pre-trek training to enhance your endurance and strength. It’s also recommended to acclimatize properly by taking rest days and staying hydrated during the trek.
Har Ki Dun Trek Safe or Best Treks For Beginners ?
Yes, the Har ki Dun trek is generally considered safe and suitable for beginners. While it is always important to be prepared and take necessary precautions when embarking on any trek, Har ki Dun offers a relatively moderate level of difficulty that can be managed by beginners who are physically fit and prepared.
Here are a few reasons why the Har ki Dun trek is often recommended for beginners:
Moderate Difficulty: The trek involves moderate ascents and descents, with gradual climbs and manageable terrains. While there are some steep sections and rocky paths, they can be tackled with proper care and trekking techniques.
Well-Defined Trail: The trail for Har ki Dun is well-marked and well-defined, making navigation easier for beginners. This reduces the chances of getting lost or straying off the intended path.
Trekking Infrastructure: The trek is quite popular among trekkers, and there is a decent infrastructure in place, including trekking guides, local support staff, and well-established campsites along the route. This provides a level of comfort and assistance for beginners who may not have extensive trekking experience.
Limited Altitude Concerns: While the trek reaches a maximum altitude of around 4,200 meters (13,780 feet) at the Jaundhar Glacier, the gradual ascent and the overall altitude profile of the trek make it less prone to altitude sickness. However, it’s always important to be aware of the symptoms of altitude sickness and take necessary precautions.
Despite being considered safe for beginners, it’s still recommended to prepare adequately for the trek. This includes physical fitness training, carrying the necessary gear and supplies, and consulting with experienced trekkers or local guides for any specific advice or precautions related to the current conditions of the trek.
Remember to plan your trek well, be aware of your own limitations, and prioritize safety at all times.
About Base camp Sankri in Har Ki Dun Trek
Not only Sankri is the base camp for the Har Ki Dun Trek but also for 25 + Himalayan treks. Thus, it always remains busy by the hustle and bustle of trekkers. This small village is genuinely beautiful because of its pleasant setting and calm environment.
There are quaint wooden houses made of Deodar wood. And also some hotels and restaurants serving delicious local food. Their specialty is “Red Rice.” So, get to know the villagers and have a glimpse of their lifestyle.
It is the best place to explore the Himalayan culture and tradition.
You will also have some excellent views of lofty Swargrohini Peaks and Bandarpoonch. And yes, do not miss their glorifying sunrise and sunset views.
Moreover, the nearest village to Sankri is “Saur” The temple of Someshwar Devta there is highly worshiped by the villagers.
Therefore, the base camp will leave you admiring its exquisite beauty
4: Best time ro visti har ki dun trek
The best time to visit Har Ki Dun Trek in Uttarakhand, India, depends on your preferences and what you want to experience during your trek. Here are the two primary trekking seasons, each with its own advantages:
Spring (March to April)
- (I) – Weather: The weather is generally clear, with longer daylight hours and meadows slowly waking up from winter.
- (II) – Temperatures: 10°C to 20°C
- (III) – Difficulty: Easy to Moderate – Ideal for first-time trekkers and nature lovers.
- (IV) – Warm Layers Needed: Light to moderate warm layers for cool mornings and evenings.
Why Do Har Ki Dun Trek in Spring?
Spring paints the Har Ki Dun valley in pastels and blooms. Alpine meadows begin to blossom with wildflowers like rhododendrons and primulas, creating a painterly trail framed by snow-kissed peaks. Clear skies offer uninterrupted views of Swargarohini and other majestic mountains. The mild temperatures and moderate trail conditions make this one of the most rewarding seasons for scenic beauty and comfortable trekking.
Summer (May to June)
- (I) – Weather: Days are warmer and longer; evenings stay cool and refreshing.
- (II) – Temperatures: 15°C to 25°C
- (III) – Difficulty: Moderate – Warm weather makes trekking pleasant, but sun exposure and altitude still require caution.
- (IV) – Warm Layers Needed: Carry warm clothing for the evenings and early mornings.
Why Do Har Ki Dun Trek in Summer?
This is the most popular season for the Har Ki Dun trek. With fully accessible trails and a snow-free path, summer offers the easiest and safest conditions for all levels of trekkers. The valley is at its most lush and vibrant, birdsong fills the air, and the rivers run clear and energetic. It’s also a great time for photography, with bright skies and dramatic mountain backdrops.
Autumn (September to October)
- (I) – Weather: Post-monsoon clarity with crisp, dry air and expansive mountain views.
- (II) – Temperatures: 10°C to 15°C
- (III) – Difficulty: Moderate – Excellent visibility and fewer weather disruptions.
- (IV) – Warm Layers Needed: Yes – Nights can get chilly, especially in late October.
Why is Autumn the Best Time for the Har Ki Dun Trek?
Autumn casts a golden glow across the landscape. Deciduous forests along the trail transform into a mosaic of red, orange, and yellow. Skies are crystal clear after the monsoon rains, offering panoramic views of the Garhwal Himalayas. The air is cool and refreshing, and with fewer crowds than summer, this season promises both serenity and spectacle.
Monsoon and Winter: Not Recommended
July to August: Monsoon rains make the trail slippery and treacherous, with high risk of landslides and leech infestations.
(II) – November to February: Winter transforms the region into a snow-covered wilderness. Sub-zero temperatures and heavy snowfall often render the trails impassable. Trekking during this time is only advised for highly experienced trekkers on specialized expeditions
5: Packing and Gear list
Essential Gear for the Har Ki Dun Trek Packing List
1. Trekking Gear & Bags
- Main Backpack (50–60 Liters): Must have good hip support and a rain cover.
- Daypack (20 Liters): Essential if you plan to offload your main bag; carries water, snacks, and a jacket.
- Trekking Poles: Highly recommended for stability on snowy slopes.
2. Clothing (The Layering System)
- Base Layer (2-3 Pairs): Quick-dry, moisture-wicking thermals (top and bottom).
- Mid Layer (2): Fleece jackets or sweaters for insulation.
- Outer Layer (2): A high-quality padded down jacket (rated for -10°C).
- Trekking Pants (2): Water-resistant and windproof pants. Avoid jeans at all costs.
- T-shirts (3): Collared, full-sleeve dry-fit tees to prevent sunburst on the neck.
3. Footwear & Socks
- Trekking Boots: High-anchor, waterproof boots with good grip Decathlon Forclaz or similar MH 100) Asain, Jonmart hiking Shoes .
- Woolen Socks (4 Pairs): For sleeping and extra warmth at night.
- Cotton Socks (4 Pairs): For trekking during the day.
4. Headwear & Accessories
- Sun Cap: To protect against UV rays during the day.
- Woolen Cap/Balaclava: Must cover your ears to prevent heat loss.
- Neck Warmer/Buff: Protects your face from cold winds.
- Gloves: One pair of fleece liners and one pair of waterproof outer gloves.
- Sunglasses: Polarized/UV protected to prevent snow blindness.
5. Personal Hygiene & Toiletries
- Sunscreen (SPF 50+) and Lip Balm.
- Moisturizer and Sanitizer.
- Toilet paper and Biodegradable wet wipes.
- Toothbrush, Toothpaste, and a small quick-dry towel.
6. Health & First Aid
- Personal Medikit: Band-aids, crepe bandage, and antiseptic.
- Anti-Altitude Sickness: Diamox (consult your doctor first).
- Pain Relief: Volini spray or Moov.
- Water Purification: Tablets or a LifeStraw.
Quick Tips for a Successful Trek with Trek Himalyan Soul
- Hydration: Drink at least 3/4 liters of water daily to help with acclimatization.
- Batteries: Cold drains phone and camera batteries fast. Keep them inside your sleeping bag at night to keep them warm.
- Eco-Friendly: "Pack it in, pack it out." Don't leave any plastic on the trail.
Must-Have Medicines for Har ki Dun Trek
1. Altitude & Breathing
- Diamox (Acetazolamide): The most common medicine for AMS (Acute Mountain Sickness). It helps your body acclimatize faster.
Note: Start a preventive dose only after consulting your doctor, as it is a diuretic.
- Camphor (Kapur): Carrying a small pouch of camphor to smell can help some people feel more comfortable while breathing in thin air.
2. Pain & Inflammation
- Combiflam / Ibuprofen: For muscle aches, joint pain, or body fever after a long day of climbing.
- Dolo 650 (Paracetamol): For mild fever or headaches (often a first sign of dehydration or AMS).
- Diclofenac Gel/Spray (Volini/Moov): Essential for calf muscle cramps or knee pain during the descent.
3. Digestive Health (Very Important)
- Digene / Pudin Hara: For acidity or bloating caused by heavy meals at high altitudes.
- Ondem (Ondansetron): For nausea or vomiting (common symptoms of altitude sickness).
- Eldoper / Nor-Metrogyl: For loose motions or stomach infections.
- ORS / Electral: To prevent dehydration. Mix one sachet in your water bottle every day.
4. Respiratory & Cold
- Ascoril/Alex Syrup (or Lozenges): For "Khonchi" (dry mountain cough) caused by cold, dry air.
- Cetirizine / Okacet: For allergic reactions or a runny nose.
- Avomine: If you get motion sickness during the bumpy 10-hour drive from Dehradun to Sankri.
5. First Aid Basics
- Band-aids & Cotton: For small nicks.
- Crepe Bandage: In case of a minor ankle sprain on the snowy trail.
- Betadine/Dettol: Antiseptic for any cuts.
- Anti-fungal Powder: To keep your feet dry and prevent fungal infections from wet socks.
Mandatory Document Checklist for Har Ki Dun Trek
1. Government Identity Proof (Original + 2 Photocopies)
You must carry a valid, government-issued photo ID. This is required for forest check-posts at Netwar and Sankri.
Accepted: Aadhar Card, Voter ID, Driver's License, or Passport.
Note: Keep two photocopies handy as one will be submitted at the Forest Office for your entry permit.
Trek Insurance mandatory
2. Medical Fitness Certificate
Trek Himalyan Soul prioritizes safety. You cannot start the trek without a certified medical report.
Requirement: The certificate must be signed and stamped by a registered medical practitioner (MBBS Doctor).
Validity: It should usually be issued within 15–30 days of the trek start date.
Criteria: It should state that your blood pressure, heart rate, and lung health are normal for high-altitude trekking.
3. Disclaimer & Waiver Form
This is a standard indemnity bond provided by Trek Himalyan Soul.
What it is: A document stating that you understand the risks of high-altitude trekking and are participating voluntarily.
Process: You can usually download this from their website, sign it, and hand it over at the Sankri base camp.
Frequently Asked Questions
why har ki dun trek famous ?
How difficulte is har ki dun trek?
what is the best time to do har ki dun trek ?
Trek Fee
Complete Package from Railway Station, Dehradun to Railway Station, Dehradun
Ethics, Health & Safety
Safety Over Summit: The mountain will always be there, but your safety is irreplaceable. Knowing when to turn back due to weather or health is the mark of a true trekker.
Respect the Altitude: Above 10,000 ft, your body follows its own rules. Prioritize acclimatization and consistent hydration; never ignore the early signs of altitude sickness.
Mountain Ethics (Leave No Trace): Carry your trash back. We are guests in the wilderness ensure the trails remain as pristine as you found them.
Trust the Experts: Local guides understand the mountain’s temperament better than any map. Follow their advice—it is based on years of survival and experience.
Physical Readiness: A trek is a physical commitment. Arriving fit ensures that you don't just endure the trail, but actually enjoy the journey.
Trek Information
- Difficulty: Moderate
- Duration: 7 Days / 6 Nights
- Altitude: 12,720 feet
- Distance: 46 kms
- Region: Uttarakhand
- Basecamp: Sankri
- Accommodation: Tents/Hotel
- Suitable For: 8 to 62 years
- Cloakroom: Available
- Offloading: Available